Side leg raises are one of the most effective yet underrated exercises for building hip strength, improving balance, and creating functional stability throughout your lower body. Whether you’re a fitness beginner looking to strengthen your glutes or an athlete seeking to prevent injury, mastering the two primary variations of side leg raises—standing and lying—will transform your workout routine and daily movement patterns.
This comprehensive guide will teach you everything you need to know about performing side leg raises with perfect form, understanding which muscles you’re targeting, and progressing through variations that challenge your body in new ways.
What Are Side Leg Raises?
Side leg raises, also known as side leg lifts or lateral leg raises, are isolation exercises that involve lifting one leg out to the side while maintaining proper alignment and control. This simple yet powerful movement primarily targets the hip abductor muscles, which are responsible for moving your leg away from your body’s midline.
The beauty of side leg raises lies in their versatility and accessibility. You can perform them anywhere without equipment, making them perfect for home workouts, physical therapy routines, or as part of a comprehensive strength training program. Despite their simplicity, side leg raises deliver impressive results when performed consistently with proper form.
Primary Muscles Worked in Side Leg Raises
Understanding which muscles you’re targeting helps you focus on proper activation and maximize your results. Side leg raises primarily work several key muscle groups:
Gluteus Medius
The gluteus medius is the star of the show during side leg raises. This fan-shaped muscle sits on the outer surface of your pelvis and plays a crucial role in hip stability. When you lift your leg to the side, the gluteus medius contracts to create this movement while also stabilizing your pelvis.
Gluteus Minimus
Working alongside the gluteus medius, the gluteus minimus is the smallest of the three glute muscles. It assists in hip abduction and helps maintain proper hip alignment during the movement.
Tensor Fasciae Latae (TFL)
Located on the outer edge of your hip, the TFL assists in lifting your leg to the side and helps stabilize your hip joint throughout the movement.
Secondary Muscle Activation
While the hip abductors do most of the work, side leg raises also engage your core muscles for stability, your quadriceps for leg control, and your standing leg’s glutes and calves for balance (in the standing variation).
The Science-Backed Benefits of Side Leg Raises
Regular practice of side leg raises delivers numerous benefits that extend far beyond muscle building:
Enhanced Hip Stability: Strong hip abductors are essential for maintaining proper alignment during walking, running, and other daily activities. Research shows that weak hip abductors contribute to various lower body injuries.
Improved Balance and Coordination: The standing variation particularly challenges your proprioception and balance, leading to better overall stability and reduced fall risk.
Injury Prevention: Strong hip abductors help prevent common injuries including IT band syndrome, patellofemoral pain syndrome, and lower back pain by maintaining proper biomechanics.
Better Posture: Side leg raises strengthen the muscles that help maintain proper pelvic alignment, contributing to improved posture throughout your day.
Functional Movement Enhancement: The strength gained from side leg raises translates directly to improved performance in sports and daily activities that require lateral movement or single-leg stability.
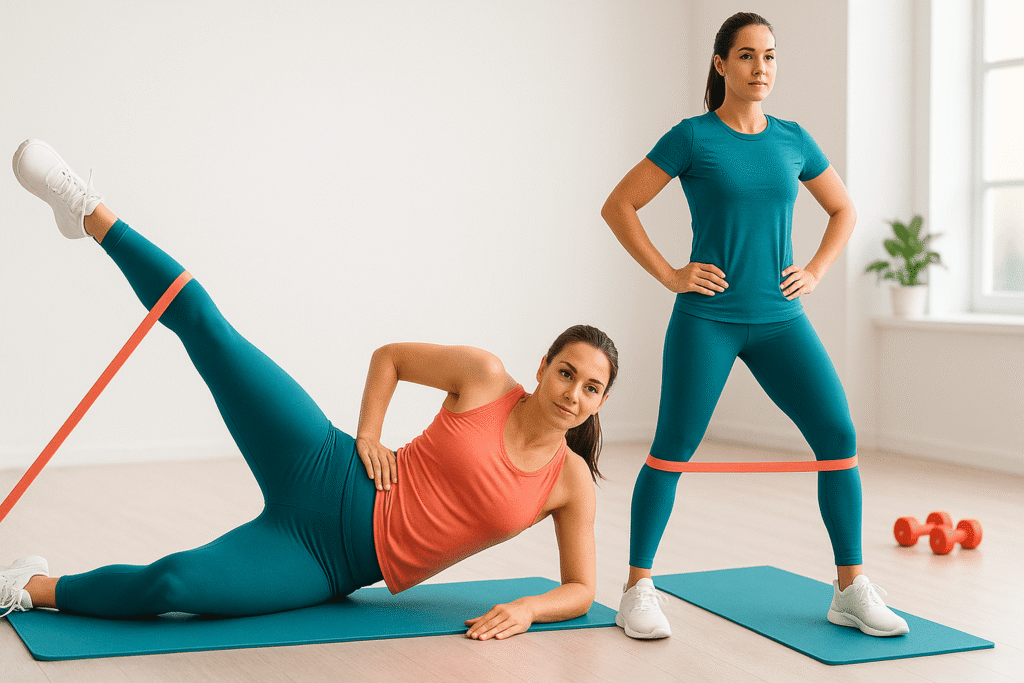
How to Do Side Leg Raises: Two Essential Methods
Method 1: Standing Side Leg Raises
The standing variation challenges your balance while building functional strength that directly translates to daily activities.
Step-by-Step Instructions:
- Starting Position: Stand tall with your feet hip-width apart, arms at your sides or hands on your hips. Engage your core and maintain a neutral spine.
- Weight Transfer: Shift your weight onto your left leg, ensuring your standing leg is strong and stable.
- The Lift: Slowly lift your right leg out to the side, keeping your leg straight and your foot flexed. Aim for a 30-45 degree angle—avoid lifting too high, which can compromise form.
- Control the Movement: Hold the top position for 1-2 seconds, focusing on squeezing your glutes.
- Lower with Control: Slowly lower your leg back to the starting position without letting it touch the ground between reps.
- Complete the Set: Perform 12-15 repetitions before switching to the other leg.
Method 2: Side-Lying Leg Raises
The lying variation allows you to focus purely on the hip abductor muscles without the balance challenge, making it perfect for beginners or when you want to isolate the target muscles.
Step-by-Step Instructions:
- Setup: Lie on your left side on an exercise mat, with your legs stacked and your body in a straight line from head to feet.
- Head Support: Rest your head on your bottom arm or prop it up with your hand for comfort.
- Body Alignment: Keep your hips stacked directly on top of each other—avoid rolling forward or backward.
- The Lift: Slowly lift your top leg toward the ceiling, keeping it straight and your foot flexed. Lift to about 45 degrees or until you feel strong activation in your outer hip.
- Controlled Descent: Lower your leg slowly, maintaining control throughout the entire range of motion.
- Repeat: Complete 12-15 repetitions before switching to lie on your right side.
Advanced Variations and Progressions
Once you’ve mastered the basic movements, these variations will keep challenging your muscles and prevent plateaus:
Resistance Band Side Leg Raises
Add a resistance band around your ankles or just above your knees to increase the challenge and muscle activation throughout the entire range of motion.
Ankle Weight Progressions
Start with 1-2 pound ankle weights and gradually increase as you get stronger. This progression works particularly well with the lying variation.
Side Leg Circles
Instead of straight up-and-down movements, create small circles with your lifted leg to challenge stability and work the muscles through different angles.
Pulsing Side Leg Raises
At the top of your lift, perform small pulsing movements for 5-10 seconds before lowering. This increases time under tension and muscle activation.
Common Mistakes and How to Fix Them
Avoiding these frequent errors will maximize your results and prevent injury:
Lifting Too High: Raising your leg above 45 degrees often leads to compensation patterns and reduces target muscle activation. Focus on controlled movement within a comfortable range.
Using Momentum: Swinging your leg up defeats the purpose of the exercise. Always prioritize slow, controlled movements over speed or height.
Poor Hip Alignment: In the lying variation, allowing your hips to roll forward or backward reduces effectiveness. Keep your hips stacked throughout the movement.
Neglecting the Lowering Phase: The eccentric (lowering) portion is just as important as the lift. Control the descent to maximize muscle engagement.
Holding Your Breath: Maintain steady breathing throughout the exercise to ensure proper oxygen delivery to your muscles.
Programming Side Leg Raises Into Your Routine
For optimal results, incorporate side leg raises into your routine 2-3 times per week:
Beginners: Start with 2 sets of 8-12 repetitions per leg, focusing on perfect form over quantity.
Intermediate: Progress to 3 sets of 12-15 repetitions per leg, adding resistance bands or light ankle weights.
Advanced: Perform 3-4 sets of 15-20 repetitions with added resistance, or incorporate advanced variations like pulsing or circles.
When to Avoid Side Leg Raises
While side leg raises are generally safe for most people, certain conditions warrant caution:
- Recent hip or knee surgery
- Acute hip bursitis or inflammation
- Severe lower back pain
- Balance disorders (for standing variations)
Always consult with a healthcare provider or physical therapist if you have concerns about whether this exercise is appropriate for your situation.
Integrating Side Leg Raises with Other Exercises
Side leg raises work exceptionally well as part of a comprehensive lower body routine. Consider pairing them with:
- Squats and lunges for complete leg development
- Glute bridges for posterior chain strength
- Clamshells for additional hip abductor work
- Single-leg deadlifts for functional stability training
Your Path to Stronger, More Stable Hips
Side leg raises may appear simple, but their impact on your overall fitness and daily function is profound. By mastering both the standing and lying variations, you’re investing in stronger hips, better balance, and reduced injury risk.
Start with the variation that feels most comfortable for your current fitness level, focus on perfect form over quantity, and gradually progress as your strength improves. Remember, consistency trumps intensity—performing side leg raises regularly with proper form will deliver better results than sporadic high-intensity sessions with poor technique.
Ready to transform your hip strength and stability? Begin incorporating these two essential side leg raise variations into your routine today, and experience the difference that strong, stable hips can make in every aspect of your movement.
Frequently Asked Questions
Q: How often should I do side leg raises?
A: Aim for 2-3 times per week, allowing at least one day of rest between sessions to allow for muscle recovery and adaptation.
Q: Can I do side leg raises every day?
A: While side leg raises are low-impact, daily performance isn’t necessary and may lead to overuse. Every other day provides optimal results while allowing for proper recovery.
Q: Which variation is better for beginners?
A: The side-lying variation is typically better for beginners as it eliminates the balance challenge and allows you to focus purely on the target muscles.
Q: How long before I see results from side leg raises?
A: With consistent practice, you may notice improved hip stability and strength within 2-3 weeks, with visible muscle toning appearing after 4-6 weeks of regular training.
Q: Can side leg raises help with lower back pain?
A: Yes, strengthening the hip abductors through side leg raises can help improve pelvic stability and reduce certain types of lower back pain, though you should consult a healthcare provider for persistent pain issues.